Category Shop Talk

Introducing: The Main(e) Light Workshop

01


I’m proud to announce the dates for my first-ever Main(e) Light Workshops .    This workshop series is focused on an area that many photographers struggle with:  using electronic flash on location.  It’s my attempt to cut through the hype around specific gear and to teach the skills that photographers can put to immediate use when creating portfolio work or meeting a deadline for a paying client.   It’s practical, it’s hands-on and it’s set up to allow (encourage) tangential topics—how best to approach assignments for clients, how to organize and optimize your workflow, etc.— as they come up in relation to the work.  But let’s not kid ourselves: the work is first and foremost.


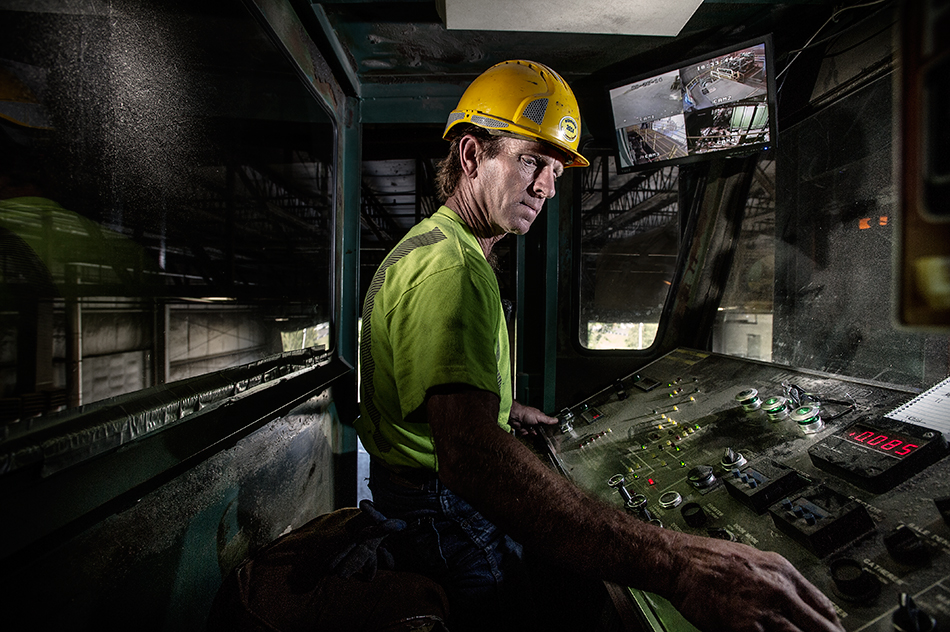
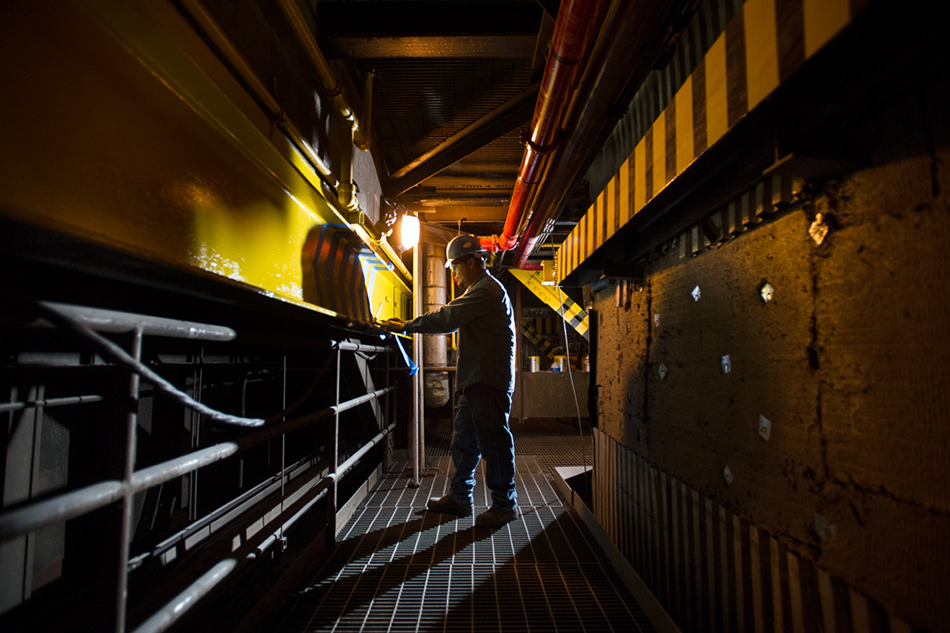
The first workshop, Speedlight Bootcamp, is built around the off-camera flashes that today can cost as much as a decent studio head.   The second is on location (in a very cool Maine setting) and combines a variety of studio and off-camera flashes with ambient (mostly sun) light to create spectacular effects.   For that one, we’ll roll with the weather and take a studied, and at times seat-of-the-pants approach to lighting to produce amazing images.


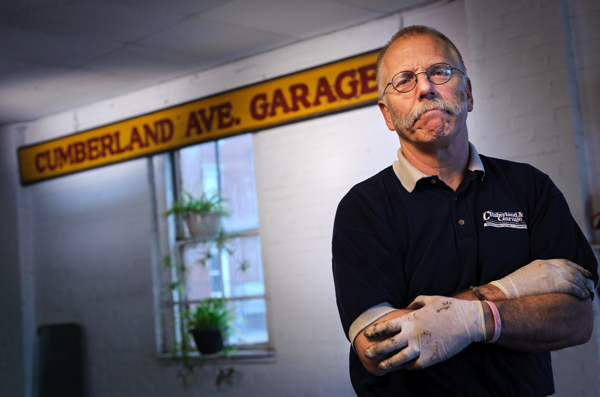
The Main(e) Light Workshop has been in the works for a year or more.  In a way,  I’ve been preparing for it my whole career.  I learned from a great many others in my field when I started out in journalism.  From Tim Rogers to Paul O’Neill to Brad Armstrong (to many others), I’ve learned about being patient, how to really connect with people and how to read light.  This workshop is my chance to help others succeed and grow in much the same way.   I’ve taught other seminars over the years, but never an intensive set of workshops quite like the Main(e) Light Workshop.  My plan is for each photographer to leave with the tools they need to create interesting portraits with the gear they can afford.   It may take years to master electronic light, but this workshop will give anyone a big boost in the right direction.

So please check out the lineup.  Tell me what you think, ask me questions.  And if you sign up, welcome.  It’s going to be a great ride.


–30–


Widdis_Charlie


speedlight_industrial_operation_by_Brian_Fitzgerald


Industrial_light_by_Brian_Fitzgerald


Fitzgerald_Edits_206

Make them love you. Hint: it’s in the details.


Storytellilng detail images from an assignment about a local water district.
Storytelling detail images from an assignment about a local water district.


No photographer is an island. We own our creativity but everything else—our technology, our access, our assignments—are enabled by others.  Even our creativity is enhanced by our collaboration with the art producers, editors and designers with whom we work most closely.  These are the folks that take the work we create and publish it, display it, print it and turn it into amazing displays, stories and campaigns.

Without them, we’re just shooting cool photos and sharing them on Facebook.

I try to approach each assignment as if I were back at the newspaper. Even if the assignment was to make a single simple portrait, I went into each job thinking about what else I might photograph. Back then, I challenged myself to come back with a three-picture package that told the story and might give the page designers more options. I always looked for storytelling details to include, too.  That approach gave the designers the ability to use images as teasers on the front page, for example. Sometimes designers used none of it.  Months down the road, looking for a timeless detail image to illustrate a different story, they’d see my image and  find it a perfect fit. This storytelling approach challenged me creatively, led to better visual play and better designer/editor kharma that I’m hoping will benefit me in my next life. It’s something I still do today, reflexively.

The editorial assignment photographer needs to always look for telling details. Sometimes these visual metaphors are more compelling, more storytelling than the ‘main’ image itself. In commercial photography, these types of details are just as important. In an era when companies have greater ability to publish content on their sites, there’s an even greater need for storytelling details that can be used as evergreen content, on company blogs and in ad campaigns.

Details also come in handy for designers who need a key visual element, or require ‘filler’ content, etc. These details solve a lot of visual problems. Having a photographer who actively looks for them is a big win because it gives the designer options.

The thinking photographer who goes the extra mile for their editor or designer will be the go-to photographer for those people. Realize that the assignment isn’t just about the image being requested, just as your job is not solely about you.


–30–


Friday Clicks: My favorite (light) modifiers

A brief disclaimer here:  light modifiers are about personal preference and taste and vary wildly from photographer to photographer.  Natch.  There are stylistic and situational reasons why a person would choose a circular-shaped modifier (like an octabox or a beauty dish) over a square-shaped light one (like a softbox).   What it boils down to is this: The size of your light modifier relative to your subject is the biggest determiner of the quality of your light (soft, harsh, dramatic, etc).  It has less to do with things like the reflective material used, shape or the brand name (or lack of one) that graces the modifier’s exterior.

With that caveat, here are five of the most oft-used light modifiers in my arsenal.  I shoot with speedlights and studio monolights–sometimes together–so these modifiers are a bit varied as a result.

1-Photek Softlighter II.  If it were socially acceptable and/or legal, I’d marry this lovely piece of gear.  As it is, it goes everywhere with me.  It produces glowing, wrap-around light, produces great catchlights and then folds down basically into an umbrella.  It’s inexpensive but looks the same as an octabox many times its cost.   I keep several on hand because they tend to be fragile.

2–Gary Fong Lightsphere.  This $10 peice of plastic has been kicking around in my bag forever and is much abused.  They get a bad rap from some photographers who think they’re cheesy, and candidly I never really liked walking around with this huge white thing sticking to my flash.  But I love it as an even light spreader when using speedlights to light up a room or doorway in the background, or even as a very close-in direct light mod for a portrait in, say, a sunset situation.  If you gaffer tape the outside, it can turn into a pretty effective snoot, especially if you put a grid over the front of it.

3–Honl Kit.   This kit is really a bunch of little pieces of gear I throw into a bag.  It includes a bunch of the velcro speed straps, a filter correction kit (which I use all. the. time.), a couple of grids, gobos and snoot.   This is perfect when doing portrait work and I put it into play when shooting interior spaces as well.

4--22″ beauty dish.  I love the light produced by beauty dishes and I have both a silver one (for outside daylight shots) and a white one (this one, by FTX lighting tools) for indoors.   The light is very directional with very even illumination, is extremely stable on breezy days outdoors and is tough.  If you put it in close, you get amazing softness with a little drama.  Move it out and you’ve got dramatic tasty light. .

5–Lastolite Triflector MKII reflector.  This is really a set of three reflectors in one, each with white and silver (or gold) sides.  They are triangular in shape and are great when you need to get a wrap-around reflection for a portrait.   With a stand they can be mounted anywhere and can produce reflections from multiple angles at once.   It’s kind of like having a tiny little photo assistant with you wherever you go whose only job is to hold reflectors and make your subjects look good.   I use this tool on too many assignments to count.


5 keys to success for photographers (Hint: it’s not about gear)

When I was first transitioning from newspaper photographer to commercial photographer, I had a huge ‘Ah-hah!’ moment. I was speaking to Jimmy Smith, a family friend and commercial photographer with 30 years under his belt.  Jimmy told me, flat-out: “You wanna know why only something like four percent of photographers make it in this business? If what we did was about photography, that number would be higher.”

Profound words that I’ve never forgotten. This, coming from a talented photographer who is truly an artist, and who works with global corporate and publishing brands.

Jimmy was speaking to the intangible, unsexy parts of the photography business (or any business). Behind the scenes of any successful venture, you’ll find the folks practicing certain habits and principles which have nothing to do with the widgets they sell or the service they actually provide.

As a former photo editor and a photographer who makes his living making images, I’m approached by students and others aspiring to make a living with their passion. As an outsider it’s easy to see whether they are heading towards success or retreating from it. In my opinion, it all boils down to good habits in a few areas (this ain’t rocket science). Successful photographers:

Show Up — I’m amazed at how often people don’t show up—for mixers, workshops, for meetings and other opportunities available to them.  When they do show up, they aren’t prepared to put their best foot forward. I’ve gotten a lot of work because I simply was the guy who showed up, was present and presentable.

Follow Up — When anyone contacts me for a internship, a job, or feedback, I do what I can to help. I may have to put them off for a short while until I can give my full attention. I’ll put the ball in their court by asking them to email or call me in a week, or to send their thoughts about what they really want, etc. Simple stuff. I do this because time is limited, and also partly to test how committed they really are. Less than 20 percent actually follow back up with me. My current full-time assistant, Charlie Widdis, certainly wasn’t the only USM student I’ve offered to help. But he is the only one who responded, made an appointment, and then followed up later. That led to me hiring him as an assistant and eventually my full-time employee.

Follow Through — When I was coming up, I’d show my work to trusted photographers and if they gave me direct and pointed advice, you’d better believe I made appropriate changes. More recently, I worked with business coach Mandy Schumaker. She helped me work through a plan to make my business stronger. I wasn’t always prepared to do what she suggested at the time, but I noted everything and in the year or so since I’ve ticked off many of the items we agreed on. This speaks to the ability to follow through—on a project, on a difficult assignment or on a relationship that needs to be cultivated (they all do).

Show Gratitude — This is a big one. I’m everything in this career because of those who have gone before me or who have lent a helping hand when I most needed it. Brad Armstrong taught me how to do location lighting. Paul O’Neil taught me to be a better assignment photographer. Rick Wiley taught me to be a better photo editor. I’m grateful to them for the photographer I have become. I’m also thankful to the many people who agree to participate in project work that I do when they don’t have to. I’m grateful to my amazing, awesome clients who trust me and continue to do so. In fact, I should be thanking people more than I do. When I receive thank-yous—whether email or hand-written note—it feels great.

Know it’s Not About Them — We all struggle with this one. The work of photographers is personal, creative and requires a point of view. But if all you know is photography, you’re in a pretty small place. It’s lonely being a photo monk sacrificing all to the photo gods. When you’re talking to clients or others, quit talking about yourself, your gear and your job. Listen. Ask about them. It’s. Not. About. You.

I have to work at each of these areas just like everyone does. What’s clear to me is that when I follow my own advice, I do well. When I don’t, well…I don’t. As Mandy likes to say, “How you do anything is how you do everything.”

–30–


The most useful iOS apps for photographers (which have nothing to do with photography)


I’ve been an avid iOS and Mac user for years now—shocking, I know, for a photographer. But when I’m not doing photography (and as a self-employed pro photographer it’s shocking how much of my activities are NOT photo-related), I’m consumed with all the various activities of being a small business owner: accounting, billing, marketing, client management, etc.   I’ve found that these less-than-sexy parts of the business are what ensure I’ll be around to service my clients for years to come.

So I’ve come to love, love the unsexy parts.

Which is why I’m obsessed with looking for better ways to do things. I have an iPad 2, which I’ve owned since it first came out.   I’ve gone through a million apps over the years, but have settled into just a few must-have apps that I use not just daily, but constantly throughout each day.   I basically run my business using these apps.  So, here is my list of my five favorite, and most-used  apps for the iPad and iPhone.  Note:  These are the apps I use right now.  As always, your mileage may vary.


Evernote (A.K.A. the king of my app universe)

Evernote


Price: Free (Premium and Business subscription services available)

One-sentence description:  Your brain, digitized.

How it works:  Evernote is arranged as a series of notes organized into notebooks.  Each note is a blank page to which you can add text, images, links and attachments (like .pdfs).  Each note can be tagged as well so you can more easily search across your account.

What I use it for:  To keep track of notes, workflows, procedures, content, research, lighting recipes, business plan, etc.  I scan receipts and other important documents, sending them to Evernote.  I also use their web clipper to save web pages for later reference.

Best non-obvious use: To keep track of all my electronic model releases.

Pros:  Simple, easy to use and free.

Cons:  For some, the fact that it’s so simple and open makes it hard to see the value when compared to apps with specific functionality.

Final Words:  I love, love Evernote.  I don’t care about  Evernote Food, or Penultimate or Skitch (their other apps).  But I’ll use Evernote all day, every day and twice on Sundays.  After a couple of years’ use, I upgraded to Premium, which allows me to collaborate by sharing specific notebooks and notes with team members.  You’ll find as I did that the more you use it, the more you’ll find value in it.


1Password

1Password


Price: $49.99

One-sentence description:  Secure digital wallet for all your logins, credit cards and software registration info.

How it works:  Using the in-app web browser, quickly login to any website with stored credentials.  Open the login “vault” to view any stored information.

What I use it for:   Before I had 1Password, almost all of my passwords were the same—a very simple, plain-English password that I chose simply because I could remember it.  Guess what?  That’s a great way to get all of your stuff hacked.

Best non-obvious use:  I upload screenshots of my various FTP server login information so that I can quickly reference that wherever I happen to be.

Pros:  Works very well and is updated often.

Cons: The price—it’s expensive, and you’ll have to pay for a separate app for you Mac or Windows machine.   Also on iOS devices, there’s no way to add new passwords with just one click like you can in the desktop version—you’ll have to manually add a new entry yourself.

Final Words:  I’ve been using 1Password for about five years now, and it seems like every month or two there’s a new update.  For an app that you’re trusting your most sensitive information to, you want to know they are working hard to protect it.


Trello

Trello

Price: Free (Subscription “Gold” service is $5/month; Business Class is $50/month)

One-sentence description:  A visual, post-it note-style project management tool.

How it works:  Consists of “Boards”, which are basically projects, made up of vertical “lists” consisting of “cards”.  Each card can contain checklists and file attachments.  Move cards by dragging and dropping them into lists, assign them a color-coded label and a due date.

What I use it for:  I’ve always been a big fan of OmniFocus, and still use it, but I’ve been using Trello for several months.  It’s become my go-to app for organizing my weekly and daily tasks, and for managing projects with and without collaboration from others on my team.  It’s the first thing I check in the morning and the last thing I check at night.

Best non-obvious use: I use Zapier to connect my Google Calendar to Trello, sending calendar entries into my Trello inbox as cards.

Pros:  It’s visual, which better matches the way I think.  It’s extremely easy and intuitive to use.  It’s free.

Cons:  Until recently, I couldn’t think of any.  Currently, my app crashes every time I delete a card on my iOS devices (it works fine via the web app).  It’s a known bug, but it hasn’t been fixed yet—more than a week after first experiencing it.

Final Words: There is a paid subscription model for Trello.  This enables you to customize the look of your boards, and are fun features, but not necessary.  More practical is the ability to have attachments larger than 10 MB each (up to 250 MB each).  If that’s useful for you, then Trello Gold is worth considering at $5/month or $45/year).   For large organizations, Business Class may be very attractive.


StreakCRM

Streak

Price: Free

One-sentence description:  A CRM (client relation management system)  fully integrated into your gmail inbox.

What I use it for: To track prospects, client and special projects, email and marketing workflow.  I also use the handy “snippets” feature, which allows me to create and store canned emails that I need to send over and over again.

Best non-obvious use:  I use it to track when I need to send follow-up emails to existing clients, and to track when (and by whom) my sent emails are opened.

Pros:  Useful, practical, easy to use.

Cons: It’s still technically in beta, which means you can expect some inconsistent behavior.   Still, the team has been releasing tons of new features, and is right on top of reported bugs.   The iOS app is optimized for the iPhone, though it will work on the iPad.

Final Words: Streak is an amazing tool.  It solves a lot of problems for me, and makes my life simpler by keeping me in my main work environment, Google Apps and Gmail.   I’m expecting them to monetize Streak at some point in the future, but it’s money that I’ll be glad to spend.  They’ve proven their value to me and it’s an app I want to support.


Dropbox

Dropbox

Price: Free (Pro subscription available for $99/year)

One-sentence description:   Store all of your files in one location and share them easily.

What I use it for:  To share files with team members, deliver large image files to clients and to back up my most sensitive files (software backups, business documents, etc.).

Best non-obvious use:  I sync my Documents folder on my Mac to Dropbox.  Essentially, my Documents folder is my Dropbox folder, which means those files are always available to me, anywhere.

Pros: Works well with many of my iOS apps.  I’ve set it so that every time I connect to a wifi network, my phone sends my most recent photos taken with the device to my Dropbox account so I can delete them from my phone.  I also can easily stream video files and view image and pdf files easily within the app.

Cons:  You only have 2GB worth of space on the free app, but at least you can gain extra space by doing things like sharing the app with a friend.  Not built for collaboration among teams.

Final Words:  Dropbox was a true pioneer in online storage, but there are many other options available now—many of whom give more storage for ‘free’ users.  I’d recommend doing your homework before deciding what’s right for you.

The art of corporate headshots


As a busy location-based commercial photographer, headshots are a staple of the services I provide to law firms, hospitals, accounting firms and other corporate clients. Although a head-and-shoulders portrait seems simple, it’s also one of the most practical, useful and important types of image I create for clients.

There are a few keys to success with corporate headshots. One is the ability to match the existing look of a headshot done by another photographer. Large, far-flung companies with multiple locations often choose to hire local photographers, but all of them must look like they’re taken by the same photographer. The ability to ‘reverse-engineer’ a photo is a very necessary component of that process. The examples below demonstrate two such situations.


Maine_Headshot_Example_01 Maine_Headshot_Example_02

 
Maine_Headshot_Example_04
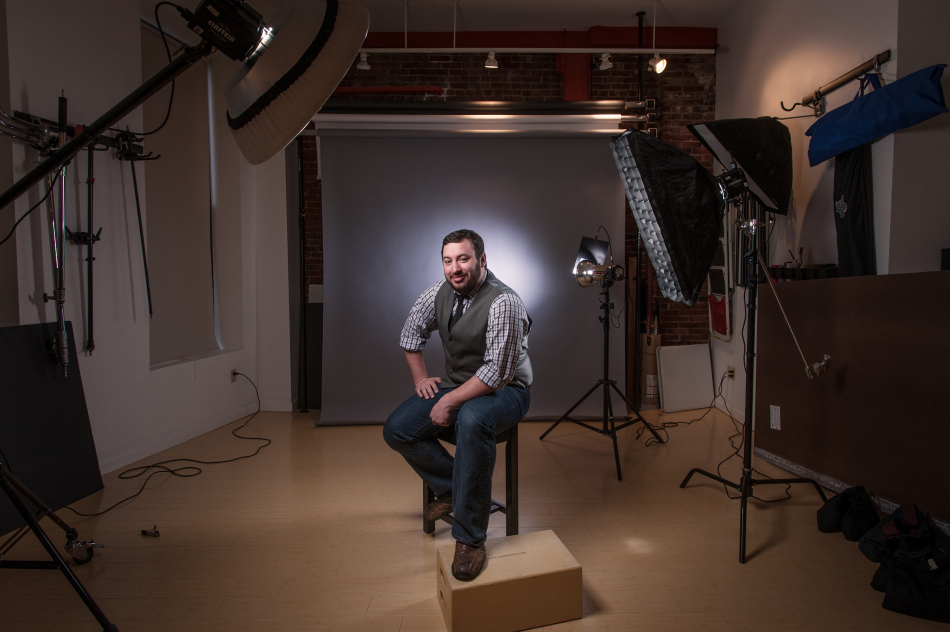
It’s critical to be able to provide suggestions that are appropriate for the brand and type of company. The same headshot done for Big Bank XYZ isn’t the same approach or look that is needed for a hip, small tech company or a creative firm. The ability to provide creative options and know what’s needed is key.


Another important component of corporate headshot photography is the process itself. I can scale my operation to fit into even tiny conference rooms. It’s rare that I work with professional models, so my subjects need a photographer who can work quickly and efficiently, and who can give them little, easy to follow direction that translate into a great image. Often I travel with a large screen so they can see exactly what they’re getting before the session is done.

Once the domain of realtors, bankers and salesmen, now everyone who uses LinkedIn, Biznik or other social networking sites for business reasons needs a headshot that is professional and is appropriate to their brand.

Maine_Headshot_Example_03

I have my digital files…now what?

[photoshelter-img width=’500′ height=’352′ i_id=’I0000w85MS3SOAJM’ buy=’0′]


I get the feeling my corporate and entrepreneur clients are thinking this when I’ve delivered a job to them.

My deliverables may include DVDs of high-resolution images, a “READ ME” file explaining color space, file format, etc, and pdf contact sheets.  Beyond that, I often post images in a protected gallery on Photoshelter, my online image library.  Each file I deliver is typically a high-resolution, 300 dpi color file, saved either as .jpg (compressed) or a .tif (uncompressed).  Think of it as a master file.  From this high-quality original file, clients can output the image in a variety of ways for specific uses including:

  • Newsprint:   Most newspapers have a line screen of 100 lpi (lines per inch) or less.   Double this number to get the necessary resolution, or dpi (dots per inch).   In addition, newspapers are printed on an offset press that uses four colors, so ideally you’d convert your file’s color space from RGB to CYMK.  Reds, blues and other colors can dramatically be altered during this conversion process, which may require additional imaging work to recover the brilliance and colors of the original image.  Lastly, because newsprint absorbs ink, photos destined for a newspaper require quite a bit of sharpening (much more than a print on photo paper) in order to look clear, sharp and bright in your average newspaper.    Most newspapers will accept any kind of high-resolution digital file, and then do all of this work for you.  If you want to make sure it’s correct, we can do it as well.
  • Photo Prints:  Most pro labs require resolutions of 240-300 dpi, so your image will automatically work great for that.   To really make it pop, it’s good to do a little bit of sharpening to your image.  It’s also useful to soft-proof the image on a color-calibrated monitor–ideally after embedding the correct .icc color profile built for the specific printer you’re using.  These are available often from the printer themselves, or you can download them here:  Dry Creek Photo.
  • Web:  Since the web is viewed on machines and screens of all types, it’s not impossible to make your image look great on every one of them.   Make sure you have a fighting chance by converting your file to the sRGB color space, or otherwise it may look too yellow or magenta on PC screens.
  • Black and White:  If your image needs to be turned black and white, you could just do an automatic grayscale conversion in Photoshop or even in free editors like iPhoto and Picasa.   It’ll work, but it’s not optimum.   My preferred way is a multi-step process that preserves detail in shadow areas and gives a much richer tone to the finished black and white image.
  • Upsampling:  If you need to make a print that is physically larger than the size of the digital image, you have a few choices.  You can resize the image to the larger size, but if it’s more than 10% larger than the original you’ll get pixelation and softness.   Again, I use special software to upsample the images to larger sizes in a way that preserves the image’s integrity as much as possible.  Keep in mind that when you size a photo up, you’re asking the software to add more pixels.  These have to come from somewhere, so basically the software takes a look at the color of the existing pixels and makes an educated guess about what color pixels to add to generate the larger-size photo.   Depending on the sophistication of the software, this can be done well or very badly.

It can be daunting when you aren’t sure exactly how to use the image files in an optimum way for each specific application, be it web, newsprint, photo print or other.   Knowing how you’ll use your images, and communicating that to your designer, photographer or programmer , is key to your success.   As part of my service, I’m happy to help my clients optimize their images for use in magazines or the web.


Moment + Light

Warren Smarlowit, 47, holds onto photos and other mementos that remind him of his family, including a nephew's athletic letter from the Yakama Nation Tribal School.

For me, photography boils down to two key elements: moment and light. You may have one in greater proportion to the other, but for most types of photography—certainly any imagery with people—you need both.

I used this criteria as a newspaper photo editor when judging daily work and the many portfolios that came across my desk.

You kinda know a “real” moment when you see one. It’s a look, an expression, or an interaction. Usually from the viewer’s perspective, it looks like you’re viewing a private scene, voyeur-style, and the subject appears totally unaware of the camera.

As a photojournalist, real moments are mostly found situations. In feature situations, the goal is to shoot photos (usually with a long lens) before the subject really becomes aware of your presence. You get something ‘real’ of the subject doing something interesting and later you deal with getting their permission and name to actually use the photos. In news situations, such as fires, accidents or events, the subjects are usually so focused on the happenings that getting moments is pretty easy, giving you time to work on composition and light too.

At the newspaper, moment trumped light any day of the week and twice on sundays. Robert Capa’s grainy, ghostly images of the landing at D-Day fails from a purely technical standpoint but no one would argue that the moment it captures place this work among history’s finest.

As a commercial and advertising photographer, my subjects are (mostly) aware of what I do. They are paying me to be there, or my clients are paying them to be there. It’s me, them and bunch of obtrusive lighting equipment, so the goal is to get the subjects to relax and give me something real despite the unreal surroundings. When successful I get a true serendipitous moment—a peice of chaos that I thankfully can not, and don’t want to, control—in the midst of a controlled setting.

The only difference between editorial and commercial photography in this regard is that non-editorial shooters have the luxury of not having to wait for the perfect light. Regardless, being attuned to capturing the authentic moment will help turn otherwise ordinary photos into memorable images.

That’s still theway I approach the debate between moment and light. Make sure you have a strong moment, and then work on the light.

Ambient light and dirty hands: meet Peter Brown

A week or so ago I found myself photographing Peter Brown, owner of Cumberland Ave. Garage (my friend Matt swears by these guys).  There always seems to be an antique car or two there, Peter’s passion.  On the day of our shoot, a 1921 Model T Ford was sitting, wheels off, in a corner of his garage, waiting for a little TLC.

I was there to get a portrait of Brown, but he was busy working in between my setups–it was a busy Monday with a line of cars needing work.  So I started by lighting the space and photographing him within it—all small lights.  In fact, I prefer working in such spaces with my small lights because of their portability and flexibility.   If you’re trying to light dramatically, you want the right amount of light in the right places.  Big studio lights tends to light everything you want and some things you don’t want, too.

I started by lighting the Model T—one flash in the interior, several working the inky black exterior  and the flourescent -bathed shop walls cluttered with tools.   My favorite is actually a tight shot (see just the headlamp of the Model T jutting into the frame.  I like the look on Peter’s face and his body language.


Portland Maine Mechanic Peter Brown
Peter Brown, owner of the Cumberland Ave. Garage on Portland's Munjoy Hill.

At the end of the shoot, I did a simple three-light setup in the bay with the colorful garage sign behind him.  I gelled the lights, but let his face go a little yellow just because I like the warm tones.

Portland, Maine Mechanic Peter Brown
Peter Brown gets his hands dirty.

Sometimes the light you find is better than anything out of a can.  While Peter did a weld repair,  I was able to show him in action in his environment.  This is the kind of stuff we’d encounter routinely on assignment for the newspaper.  Quick couple of portraits, enhanced by ambient light, and an interesting angle on a man going about his business in his environment.

Portland Maine Mechanic Peter Brown
Ok...that looks cool. Strobes off, ambient light on...

The gear you need when on the road

Pocket Wizard Radio Transmitter

We’re just a couple of weeks from our Traveling Light Workshop, and as a lead-in I’m previewing some of the topics and shoots we’ll cover during the three-hour class.

You can’t  discuss portable lighting without getting heavy into some nerdy gear discussions.   So, we’ll be talking plenty about triggering your flashes using manual and auto triggers—everything from old-school sync cords to off-camera TTL cords, from optical slaves to Pocket Wizards and Radio Poppers.

But it’s not all about gear.  It’s also about technique—how you approach a shoot and what works best for different situations ‘in the wild’.

As always, the best system for you is the one that fits your budget and allows you flexibility in lighting on location.

I’ve gotten requests from people who want to bring their flashes and other gear.  Great!   We’ll discuss those and, time permitting, will give hands-on demos with your gear.

If you have any questions about off-camera lighting that you want to make sure we cover, shoot me an email with your feedback.