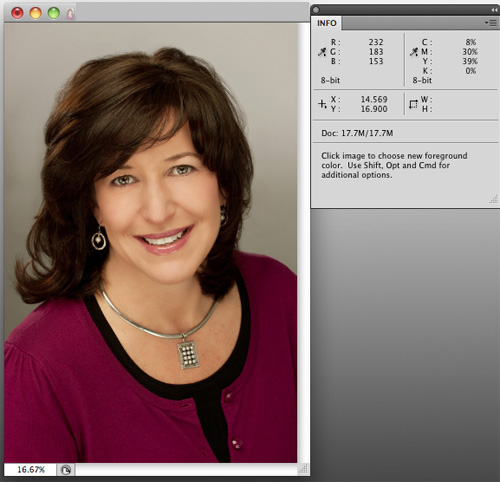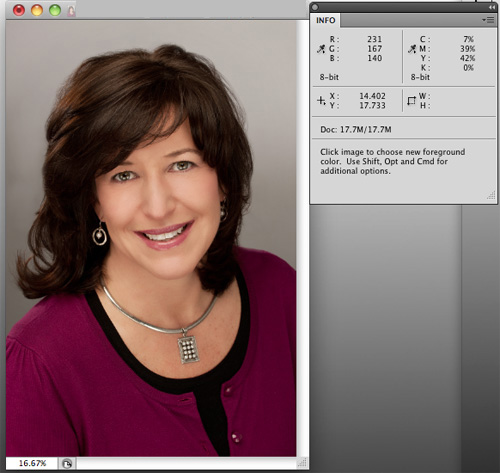
Proper skin tone is a must for any professional portrait. Sometimes, especially when shooting in natural-light conditions, a warmer or cooler color of skin is desired. When in studio or daylight conditions, however, skin tone and color is critical for making sure faces look natural and healthy.
You can’t just judge the tones of a photo by visually assessing it on a computer monitor, unless you have a recently calibrated screen. Everyone sees color differently. Instead, it’s best to use objective numbers. Select the eyedropper tool in Photoshop and hover over the skin areas in your image to see the C,M,Y,K values. You must have the “Info” window open to do so. The Info palette is a densitometer that measures the amount of cyan, magenta, yellow and black present in your image. These are the colors that make up the four-color printing process. Even though your images most likely are being rendered in an RGB space and may never need to be converted to CMYK, we use the CMYK values in the densitometer to measure whether our skin tone is where it needs to be.
Primarily, we’re concerned with relative values, not absolute values. For example, For Caucasian skin, you’d likely see the numeric values for M (Magenta) in the 30-50 range. It really doesn’t matter where it is; what’s important is this value relative to the Y (Yellow) number. For white, Caucasian skin the Y value should always be about 3-5 points above the M value. K? That’s black, by the way–and it should read quite low, in the single digits, or zero. The C, or Cyan, value, should be roughly a third of the value of the M or Y numbers. So for our current example, a C value of 8-15 would be dead-on. Without going into specific sets of numbers for all the various kinds of skin, the darker the skin, the higher the Cyan value should be relative to the M and Y values.
By the way, this whole number scheme doesn’t really work if the skin you’re working with has been lit by any extreme light–you know, the gorgeous, golden glow of a sunset or the cool glow of a neon sign. You have extreme light, you want to preserve that. You don’t want ‘natural’.
So, once you’ve determined that you DO want natural skin tone and you’ve identified the problem–that guy’s skin looks really pink and you’ve confirmed values of, say, Y=35 and M=75–then how do you fix it?
There are a lot of great ways to do so in Photoshop, and what works for one picture won’t always work for another. That said, my go-to first tool is always “Replace Color” (Edit–>Adjustments–>Replace Color). To use it, simply click on a lit, shadowless area of skin and select the degree of latitude (called ‘fuzziness’) you want your selection to cover. A high degree of fuzziness will select more areas of the image that match the tone of the skin area you clicked on. Once that’s done, move the sliders to adjust the Hue, Saturation and Lightness. It doesn’t take much. In the example below, I moved the Hue slider to -3, the Saturation slider to -5 and the Lightness to +1. I’ve rarely had to go above 10 on the Hue slider, which is my primary adjustment slider.
That’s really it–just move the eyedropper icon over the skin again to read the new values and, if they look good, go with it. Again, it may be difficult but you should trust the numbers way, way before you trust your eyes. A properly adjusted image will reproduce on any calibrated printer even if it doesn’t look great on your uncalibrated screen.
So pay attention to your skin values, and try out Replace Color. Doesn’t your skin deserve it?

