In Photoshop there are several different ways to sharpen your images. The two which I use routinely are quite different from each other, and are applied at opposite ends of my workflow.
Again, I’d love to hear from other photographers who use methods other than those I’m describing.
First, it’s important to understand that there are two (at least) different reasons for sharpening your images in the first place. There’s the sharpening you do to an untouched or out-of-camera file that restores the native sharpness of those fantastic, thousands-of-dollars lenses that you attach to your camera. The second reason is to sharpen your images specifically for the intended medium of display (newsprint, photo print, computer screen or Wheaties box).
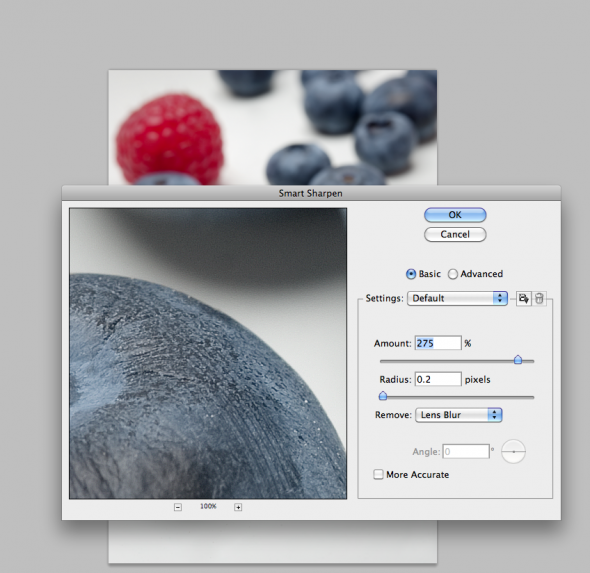
It’s surprising that with such great lenses, images from digital cameras look a bit soft at magnification. That’s due in part to the low-pass filter built into the camera. So, a good way to address this is by using the Smart Sharpen option in Photoshop (Filter–>Sharpen–>Smart Sharpen). When you first open the Smart Sharpen dialog box, you’ll have to select “Lens Blur” from the small drop-down menu. I use the basic rather than advanced, and typically set the sliders to a maximum amount of 275 and with a radius of 0.2. Click the preview box and see the difference. It’s an awesome tool and is best applied to images right out of the camera, before any other work is done. See screenshot below:

What about Unsharpen Mask? This is the favorite tool of photojournalists used to outputting images to be printed on tissue paper—aka, newsprint. Newsprint is a poor printing medium as ink spreads and blots when it hits the fibers, rendering the sharpest images as indistinct blobs. Hence, you must know what the final destination of your images will be. If Newsprint, you’ll want to use higher levels of sharpness. For prints, it’s less. For screen/web, it’s still less. An image that looks great for newsprint will look terrible on the screen, with halos around bright areas. Once you apply Unsharpen Mask, your image is ‘damaged’ forever. It should be the final step before output, after all other imaging is done. It should never be done to a “master” version of a file that will be archived and used in potentially different ways later on. Check out this handy table for approximate starting points for various output destinations (with due thanks to Rob Galbraith):

Finally, to recap: Use Smart Sharpen to make your images pop the way your lenses intended for them to. Save a master version of your final files and output variations of that file with different amounts of Unsharpen Mask depending on what that image will be used for: newsprint, print, web, etc. Rinse and repeat.
